Homemade raw apple cider vinegar is easy to make! This fall DIY uses whole or leftover apples. Adapt this recipe to make other fruit vinegar as well!

by Danielle of It’s a Love/Love Thing
Hello, Humbled Homemaker readers! I’m so happy to be here with you this morning. I’m Danielle, I blog over at It’s a Love/Love Thing. . . and I must tell you – I have recently discovered something:
Every once in a while, you can even surprise yourself.
You see, I’m a summer girl. I love the feeling of warm sunshine on my skin. I love wearing shorts, tank tops, sunglasses and flip flops.
For as long as I can remember, I have had very little use for cooler weather and so, each year, when autumn would start to creep in, a little bit of my fire would go out, and I would start dreading the coming cold.
However, a few years ago, we moved to sunny Arizona, where I get my heart’s absolute fill of sunshine and nice, HOT weather. And then something funny happened. . . I found myself starting to appreciate the cooler, brisk fall air. I started creating yummy pumpkin-flavored desserts for my family. I looked forward to fall trips to nearby apple orchards and pumpkin patches.
I discovered I really do love fall!
So that’s where I am these days, finally joining the rest of you fall-lovers. As I mentioned, trips to the apple orchard to pick fresh apples are a favorite family memory, leaving us with pounds and pounds of amazing, delicious apples. There are so many things you can do with apples!
One of the best things you can do, in my opinion, is make your own raw apple cider vinegar. After all, apple cider vinegar has so many uses! You can use it to soak grains for easier digestion, add a little tang to dairy-free dips and dressings, and use it in delicious homemade cole slaw. You can even add it to smoothies! The possibilities are endless.
And what’s even better: It is one of the easiest things you can make, and costs way less than store-bought. So let’s get started, shall we?

Image by Danielle Baethge
Homemade Raw Apple Cider Vinegar
Ingredients:
- apple peels, cores, hulls, and seeds left over from processing apples – OR – you can just chop up some apples, enough to fill your jar about halfway or more (Please be sure to read notes section before making this recipe.)
- Sugar-water at a ratio of 1/4 cup sugar dissolved in 1 quart non-chlorinated water, as much as you need to mostly fill your jar
- Store bought Apple Cider Vinegar – the RAW kind, which contains the “mother” – you will need to add 3 tablespoons ACV per quart of water you add to the jar. This serves as a starter culture and helps with acidity.
Equipment:
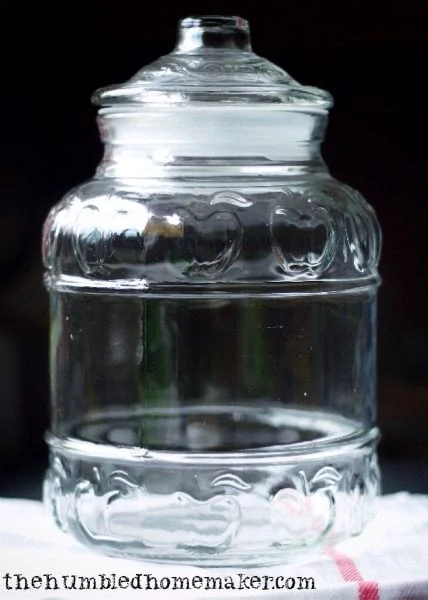
Image by Danielle Baethge
- a large glass jar – I use this 3-quart jar I found at a discount store, but you can use 1/2 gallon or even 1 gallon jars, whichever you prefer.
- knife and cutting board if chopping apples
- Coffee filter or cloth towel to cover jar opening, and rubber band to secure it
Instructions:
- Place apple pieces into jar.
- Add enough sugar water to nearly fill the jar. (Be sure to leave enough room to add the ACV starter.)
- Add your apple cider vinegar to the jar.
- Cover with coffee filter/towel and secure with rubber band. Leave at room temperature for one week.
- After 1 week, strain out the fruit. Return to glass jar, cover, and allow to ferment for another two weeks. Stir every couple of days. When finished, transfer to a glass bottle of your choice.
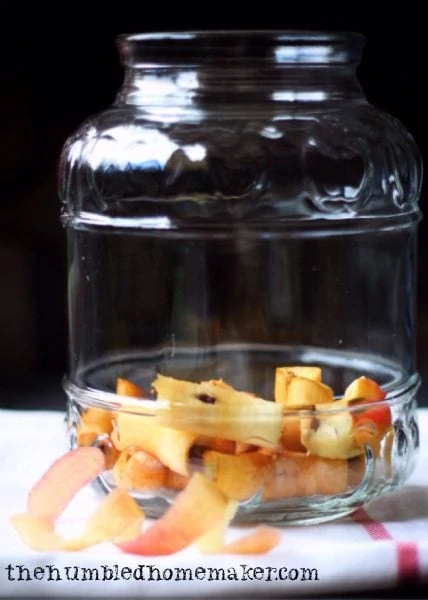
Image by Danielle Baethge
Notes:
- Make sure before you start the process that your apples are well-washed. You may use bruised or browned fruit but not moldy fruit.
- You will want to use organic apples; any pesticides will affect the culture.
- After a while you will start to notice a strange, rubbery blob forming at the top of your vinegar – it’s forming its own mother! That is a good sign. 🙂
- You can use your favorite granulated sweetener to make the sugar-water, but it has to be an actual sugar. (No stevia, xylitol, etc.) This can be pure white sugar or a less-processed sugar like sucanat. It’s there to feed the yeast and will be consumed by the time it turns to vinegar.
- You can use raw honey but since the honey has its own mix of microbes, it will change the culture a bit. It might take longer as well. (I have never tried it.)
- Different varieties of apples make different-tasting cider. I use Gala, but I bet a tart apple like a Granny Smith would be amazing.
- You can actually do this with many different types of fruit! Try it with organic peaches, pears, cherries, pineapple, grapes, etc.
- If you end up with a moldy batch, toss it, no exceptions. Try using more ACV as a starter next time.
- Homemade vinegars vary in strength. You can expect a homemade vinegar like this one to be around 6 percent acetic acid or stronger.
- You can re-use old glass ACV bottles to keep it in when it’s finished. I also love using glass swing-top bottles. Using a non-metal lid is preferred; vinegar corrodes metal.
Homemade Raw Apple Cider Vinegar
PrintIngredients
- Ingredients
- apple peels cores, hulls, and seeds left over from processing apples - OR - you can just chop up some apples, enough to fill your jar about halfway or more (Please be sure to read notes section before making this recipe.)
- sugar-water at a ratio of 1/4 cup sugar dissolved in 1 quart non-chlorinated water as much as you need to mostly fill your jar
- store bought Apple Cider Vinegar - the RAW kind which contains the "mother" - you will need to add 3 tablespoons ACV per quart of water you add to the jar. This serves as a starter culture and helps with acidity.
- Equipment
- a large glass jar - I use a 3-quart jar I found at a discount store but you can use 1/2 gallon or even 1 gallon jars, whichever you prefer.
- knife and cutting board if chopping apples
- coffee filter or cloth towel to cover jar opening and rubber band to secure it
Instructions
- Place apple pieces into jar.
- Add enough sugar water to nearly fill the jar. (Be sure to leave enough room to add the ACV starter.)
- Add your apple cider vinegar to the jar.
- Cover with coffee filter/towel and secure with rubber band. Leave at room temperature for one week.
- After 1 week, strain out the fruit. Return to glass jar, cover, and allow to ferment for another two weeks. Stir every couple of days. When finished, transfer to a glass bottle of your choice.
Notes
- Make sure before you start the process that your apples are well-washed. You may use bruised or browned fruit but not moldy fruit.
- You will want to use organic apples; any pesticides will affect the culture.
- After a while you will start to notice a strange, rubbery blob forming at the top of your vinegar - it's forming its own mother! That is a good sign. ????
- You can use your favorite granulated sweetener to make the sugar-water, but it has to be an actual sugar. (No stevia, xylitol, etc.) This can be pure white sugar or a less-processed sugar like sucanat. It's there to feed the yeast and will be consumed by the time it turns to vinegar.
- You can use raw honey but since the honey has its own mix of microbes, it will change the culture a bit. It might take longer as well. (I have never tried it.)
- Different varieties of apples make different-tasting cider. I use Gala, but I bet a tart apple like a Granny Smith would be amazing.
- You can actually do this with many different types of fruit! Try it with organic peaches, pears, cherries, pineapple, grapes, etc.
- If you end up with a moldy batch, toss it, no exceptions. Try using more ACV as a starter next time.
- Homemade vinegars vary in strength. You can expect a homemade vinegar like this one to be around 6 percent acetic acid or stronger.
- You can re-use old glass ACV bottles to keep it in when it's finished. I also love using glass swing-top bottles. Using a non-metal lid is preferred; vinegar corrodes metal.
Wasn’t that simple? What I love most about making your own homemade products is how incredibly easy most of them are. Enjoy your homemade apple cider vinegar, and enjoy your fall season. I’ll be enjoying it with you.
Have you ever made your own Apple Cider Vinegar? Any tips you would care to share?
Danielle Baethge is first and foremost a daughter of the Most High God. She is married to her best friend, and they have three young sons and a young daughter. She is a recovering procrastinator, a Real Foodie, and an unapologetic daydreamer. She and her family currently reside in sunny Arizona. You can find Danielle blogging about health, homeschooling, family, life, love, simplicity, and her affinity for bacon at It’s a Love/Love Thing. Also be sure to follow her on Facebook, Pinterest, Twitter and Instagram.


Angela Mackey
Maybe I should know this, but I don’t. How do you get non-cholorinated water?
Danielle
Hi Angela! That’s a great question! There are several ways you can get water that is not chlorinated:
1. You can use a chlorine filter, but those are sometimes a challenge to find.
2. You can usually get Reverse Osmosis water or distilled water by the gallon at your local grocery or convenience store
3. Or, the easiest method, you can boil tap water and let it cool to release the chlorine gas.
I hope that helps! <3
Wanda
Once you have established your Apple cider vinegar can you then use it to make other batches? I can’t wait to make my own!
Danielle
Yes! 🙂 Have fun!
Sarah
Hi! Thanks for the great post! I’ve never made acv before, so I might have some silly questions. How long is it good for? Do you keep on counter or in fridge once it has fermented for 2 weeks and it’s done? Also, can you can it or freeze it and batch make? I’ll be making lots of applesauce and canning, so will have lots of skins, cores, seeds. Thanks so much!! 🙂
Danielle
These are great questions, and thank you for asking! That helps everyone! 🙂
The vinegar should stay shelf-stable indefinitely. When you’re done, you can keep it tightly lidded and keep in in a cool place like your pantry, just as you would regular vinegar.
Canning will ruin the live cultures that are in the vinegar, so while you can do that, I wouldn’t recommend it. I wouldn’t personally can it or freeze it; there is no need to as it will keep without those measures. I hope that helps! 🙂
Sarah
Thank you! That is super helpful! One more question…I saw you said glass jar with glass lid is best because of corrosion. Eeek, I was going to use quart canning jars because I have a ton! If I don’t fill it all the way to the metal lid will it still corrode? Do you think canning jars would work okay? (not to can of course, but just to store in), Thanks again!
Danielle
You could always try it! If you do notice corrosion on the lids, maybe you could sub with a plastic lid. I know my plastic mayonnaise lids fit my small-mouth jars. I also have some plastic lids from Ball that I bought on Amazon that fit canning jars. Good luck! 🙂
Andrea F.
Hi! I am trying this today and I have a question. After 1 week and straining the fruit, you say to cover to let ferment further. Do I cover with the coffee filter/towel or do I completely cover with a lid?
Danielle
Great question! You will re-cover with the filter or towel. The yeasts in the ferment need oxygen to continue fermenting. 🙂 Have fun!
Heather
Hi there – I’m just straining my first batch now. Do I throw out the rubbery blob with the fruit? Also, fruit flies are normal, right? Thanks!
Lisa rollins
Hi, after a week when I went to strain the fruit there was mold on the apples. I threw it out like you said. Do you think I just need more ACV?
CarolC
Put the fruit into a container which will allow a small plate or lid to fit down inside. Once you have all of the ingredients in the container, put the lid or plate inside and put a little weight on it. this will submerge the fruit and prevent air from getting to it, which will help prevent the fruit from molding.
Clara
I should probably know this but what is the “mother” in Vinegar?
Erin
I think it just means it’s raw! Bottles with it will say “the mother” on it: http://amzn.to/1LR89BZ
Rebeccah H
I wonder, would this be okay with wild apples? We have plenty near me, nowhere near any pesticides so a much cheaper choice than organic apples.
Erin
It would probably be even better!
Malcolm
Here’s another little trick to keep the apple scraps completely covered; take a clean plastic grocery bag, fill it partly with water and close it at the top so there’s some air in the bag too but it’s still loose and kind of flopsy, and set it on top of the apples and sugar water. It will expand to contact the sides of the jar, and that will keep out the mold spores and such from touching the apple pieces, while keeping them completely covered with the water. No guarantee, but it seems to help. Works for making sourkraut too.